
Paint swirls are something we deal with all the time and the number 1 question we get asked is :
Do black or dark coloured cars have more swirl marks?
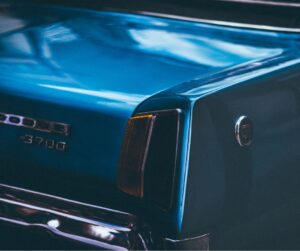
They don’t, but Black cars show swirl marks more clearly than lighter colours. This is because swirl marks reflect light unevenly, which is more noticeable on darker surfaces.
Are Swirl Marks Permanent?
These marks will not go away on their own, but they can be removed with paint correction techniques which we will discuss below.
We have to remove the damaged clear layer and create a flat surface with no imperfections.
How To Remove Swirl Marks From Your Car’s Paint
Have you ever gone to your car in the morning at sunrise and noticed that your paint has a spider web effect?
This spider web effect is typically referred to as Swirl Marks – a very common paint defect that every car owner faces sooner or later.
What Are Swirl Marks?
Swirl marks are on most cars and result from a collection of thousands of micro-scratches on the clear coating that comes together to create this swirling effect on your paint.
It affects the shine of the paint, making it look dull and unimpressive.
What causes swirl marks?
They are small scratches that happen in the clear coat layer. The scratches typically happen when your car is being washed or cleaned.
The main culprits are:
- Automatic car washes
- Grubby sponges or wash mitts
- Dirty water
- Drying cloths or chamois that are dirty
- Stiff chamois
- Wiping off dirt or dust with a dry cloth
- Putting dirty car covers on the car
If you have a new car and want to avoid swirl marks, then invest in the right car washing products and techniques or pay to have a professional hand wash done to your car.
Removing Swirl Marks by Hand
Hand Wash Your Car
You need to ensure you wash your car before polishing the polishing step to avoid dirt and grime getting stuck in your applicator pad. This will only add more scratches to your paint.
- Wash your vehicle thoroughly using a good quality car soap and the two bucket wash method and dry it off.
- Start at the top of the car and work your way down panel by panel.
- Be sure to rinse your wash mitt in your rinse bucket after each panel before adding more soap.
- This will ensure maximum cleaning power and also prevent you from dragging dirt over the surface of your car.
- Most cars will have iron residue from brake dust. Removing this is a must in order to proceed to the next step.
- Do this step out of direct sunlight. Find a shaded area.
- Spray all painted surfaces of your vehicle with a high-quality iron remover and let it sit for a few minutes.
- After a few minutes, you will see purple stains around the vehicle – This is the iron contamination breaking down. Wait for approx 5 minutes, rinse off the entire car and then dry it thoroughly with a microfiber towel.
- After washing, rinse off the excess soap and dirt and dry the car with a high-quality microfiber towel.
- To avoid damage while drying, you can use a leaf blower to remove most of the water before wiping the car dry. Ensure you do not blow dust and dirt onto your newly washed car if you try this.
Using A Clay Bar
The next part is claying your vehicle.
So when should you treat a vehicle with Clay Bar?
A quick test is when you rub your hand over a dry vehicle’s paint, check to see. If you feel bumps, They are likely to be paint contaminants, and you should clay bar the car.
If the paint feels completely smooth, you can skip the clay process.
You need to remove these embedded particles before you polish, or they will get caught in the polishing pad and damage your paint even more.
- Apply the clay pad with some clay lubricant and use some of this also on the vehicle’s surface.
- Working in 2 x 2 or 3 x 3 sections, lightly scrub the surface with the clay in up and down motions.
- You will notice that the surface becomes smoother after each pass.
- After you feel little to no embedded particles, buff it off.
- Remember that while you are using a clay bar, you will physically see the particles on the clay, so be sure to use a fresh side as needed.
- If you are using a clay glove, rinse it to remove the contaminants.
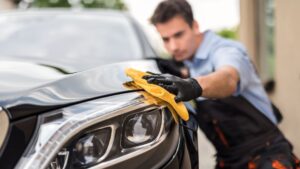
Polish your car
After your car is clean and dry, take a new microfiber cloth or applicator pad.
Apply a few drops of polish. Work in circular motions that overlap in a 3×3 area using light to medium pressure. Using a new microfiber cloth, wipe off the excess residue to achieve a swirl-free, high-gloss shine!
Repeat this process panel by panel until the entire car has been done
To Remove Stubborn Swirl Marks.
Stubborn swirl marks are going to require you to use a buffer.
Years ago, auto mechanics used high-speed rotary buffers to remove swirl marks, but the rotary buffers were difficult to use and could damage the paint even more if used incorrectly.
There are now easy-to-use DA polishers.
These machines are easy to use and deliver amazingly professional results in half the time compared to polishing by hand.
To prepare for machine buffing, you prep your car exactly as the above steps:
- Wash the car
- Remove brake dust
- Dry the car
- Clay the car
- Examine the paint with a light and see what areas need the buffer.
- If some areas have only a small amount of swirl marks, you can hand polish those areas as above.
- If it looks very dull and has layers of swirl marks, you will likely need to touch up and polish the surface. This process is called a two-step process.
Prepare Your Polisher And Pad.
Take your polisher and make sure you centre your foam polishing pad on the polisher’s backing pad.
If your pad is not centred on the backing pad, it will interfere with your machine and make it difficult to remove swirl marks.
Then prime your polishing pad by applying six pea-sized drops of car polish.
Basic Tips For Polishing Your Car For Beginners.
- Apply the polish first by putting a sufficient amount on the pad and then spreading it on the car paint before turning on the polisher.
- If you turn on the polisher with a large glob of polish on the pad, the polish will fly off.
- Work in small sections of 2ft X 2ft.
- Keep sensitive painted areas taped off, so you don’t cover them with polish residue.
- Use your polisher on a slow speed and spread the polish in a 3×3 area.
- Polish in slow, controlled, overlapping motions, being careful not to use too much downward pressure.
- When the polish becomes transparent, stop the buffer and check your result with a LED light or flashlight.
- Polish the polished area until it is clear, but stop before the polish dries.
- When the buffer is running, keep it in contact with the vehicle’s surface and turn it off before lifting it off the paint.
- If the pad touches the ground, replace it or wash it thoroughly, no matter how clean it looks. Even a single grain of dirt left on the pad can leave scratches on your vehicle’s paint.
- Clean your pads between trims as they will begin to stick with polish residue.
- This affects the pad’s effectiveness, so it’s essential to keep it clean for best results.
- If swirl marks remain, you may need a more aggressive pad and polish.
- Change the pad to a more heavily cut pad and the polish to a more heavily cut compound.
- Start the polishing steps again with the new pad and polish.
- Recheck your results with a light source.
- Once the swirl marks are removed in each area, move to the next section
- If you used putty and coarse-grained polishing pad to remove the swirl marks, you would likely need to re-polish the surface with a lighter polish.
This process is called a two-step process.
Protect Your Finished Work
Protect the car with a wax, sealer or ceramic coating.
After spending so much time with the polisher to remove the swirls, you’ll want to protect your hard work with a high-quality sealer, wax or coating.
Have you looked to see if your headlights need restoration?
This will help you maintain that shiny finish while protecting the paint from the elements.
The ceramic shine adds even more shine to your paint while protecting it from environmental elements.
If your car has swirl marks, welcome to the club!
Every car will have some level of scratch marks over time.
If you’re polishing by hand, take your time and use a quality polish, it will speed up the process and give better results.
If you’re polishing with a machine, make sure to do a trial run to see if a one- or two-step polishing process is needed.
Remember to protect your now swirl-free finish with a quality wax, sealer or ceramic coating!
This process can take several hours, even up to 12 hours, if you need to do the two-step polishing process.
If you would prefer to use a professional car detailing service, you will be guaranteed a perfect result in a much faster time. If you are in Brisbane check out www.cardetailersbrisbane.com.au
The Article Removing Paint Swirls On Your Car was found on https://limitsofstrategy.com


Comments are closed